Paint.NETなどの画像処理ソフトを使うと、簡単に画像にぼかしを入れることができます。
しかし、大量の画像ファイルに対して処理を行う場合、いちいち手作業で行っていては効率が悪く時間も掛かってしまいます。
そこで、何らかの方法でバッチ処理できないか調べたところ、GIMPを使うとスクリプトを定義してバッチ処理できることが分かりました。
GIMPの準備
使用するGIMPですが、今回は手軽なPortable版を使用します。
- GIMP PortableからGIMPPortable_*.*.*.paf.exeファイルをダウンロードして、適当なフォルダにインストールします(今回は「C:\Software\GIMPPortable」フォルダ)。
- テキストエディタに下記コードを貼り付けます。
- 文字コードを「UTF-8N」に、拡張子を「scm」にして、GIMPのスクリプトフォルダにファイルを保存します。Portable版の場合、スクリプトフォルダは「GIMPPortable\App\gimp\share\gimp\2.0\scripts」になります。
(define (gaussian-blur-batch filename posX posY selWidth selHeight)
(let* ((image (car (gimp-file-load RUN-NONINTERACTIVE filename filename)))
(drawable (car (gimp-image-get-active-layer image))))
(gimp-rect-select image posX posY selWidth selHeight 2 0 0)
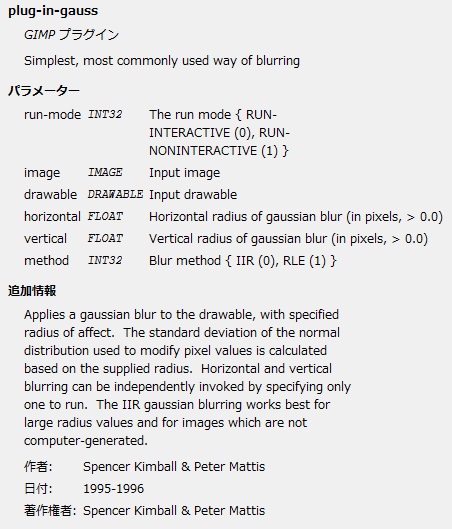
(plug-in-gauss 1 image drawable 50 50 1)
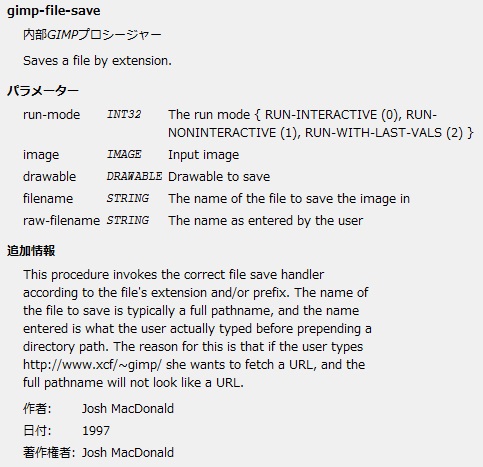
(gimp-file-save RUN-NONINTERACTIVE image drawable filename filename)
(gimp-image-delete image)
)
)
上記コードでは、
ファイル読み込み
↓
指定した範囲を選択
↓
ぼかし(ガウス)処理実行
↓
ファイル保存
といった処理を行います。
各工程の引数は必要に応じて変更してください(下図参照)。

作成したスクリプトは、下記のようにコマンドラインからオプション指定で実行することが出来ます。
GIMPPortable -i -b "(gaussian-blur-batch \"C:\\Test\\001.jpg\" 1038 84 270 270)" -b "(gaussian-blur-batch \"C:\\Test\\002.jpg\" 1038 84 270 270)" -b "(gaussian-blur-batch \"C:\\Test\\003.jpg\" 1038 84 270 270)" -b "(gimp-quit 0)"
ただ、複数のファイルを指定するのにいちいちオプションを追加するのは手間なので、手軽に処理できるように簡易的なUIを用意することにします。
HTA製フロントエンド
下記記事でも使いましたが、再びHTAの出番です。

- テキストエディタに下記コードを貼り付けます。
- 文字コードを「UTF-8」に、拡張子を「hta」にしてファイルを保存します。
<!DOCTYPE html>
<!--
GIMPぼかし(ガウス)バッチフロントエンド
指定したフォルダ内の画像に部分的にぼかし処理をかけます。
@kinuasa
※要GIMP(Portable版でも動作可能)
※https://www.gimp.org/ からダウンロード
-->
<html>
<head>
<meta charset="UTF-8">
<meta http-equiv="X-UA-Compatible" content="IE=10">
<title>ぼかしバッチフロントエンド</title>
<style>
* {
font-family: "Segoe UI", Meiryo, "メイリオ", sans-serif;
font-size: 11pt;
}
table {
border-style: none;
}
tr, td {
border-style: none;
padding: 5px;
}
input[type="radio"], label {
cursor: pointer;
}
#btnExec {
border-top: 1px solid #96d1f8;
background: #65a9d7;
padding: 15px 30px;
color: white;
font-size: 16px;
text-decoration: none;
vertical-align: middle;
}
#btnExec:hover {
border-top-color: #28597a;
background: #28597a;
color: #ccc;
cursor: pointer;
}
#btnExec:active {
border-top-color: #1b435e;
background: #1b435e;
}
</style>
<script language="vbscript">
Option Explicit
Private Sub window_OnLoad()
'ウィンドウリサイズ・移動
window.resizeTo 600, 300
window.moveTo 250, 250
End Sub
Public Sub rdoSetValue_OnClick()
'初期値設定
Dim PosX, PosY, SelWidth, SelHeight
Dim elm
Dim v
PosX = 0: PosY = 0: SelWidth = 0: SelHeight = 0
For Each elm In document.getElementsByName("q")
If elm.checked = True Then
v = elm.id
Exit For
End If
Next
'----------------------------
'初期値要設定
'----------------------------
Select Case v
Case "rdo1"
PosX = 1038
PosY = 84
SelWidth = 270
SelHeight = 270
Case "rdo2"
PosX = 476
PosY = 102
SelWidth = 361
SelHeight = 88
Case "rdo3"
PosX = 53
PosY = 1940
SelWidth = 345
SelHeight = 30
End Select
'----------------------------
document.getElementById("iptPosX").Value = PosX
document.getElementById("iptPosY").Value = PosY
document.getElementById("iptSelWidth").Value = SelWidth
document.getElementById("iptSelHeight").Value = SelHeight
End Sub
Private Sub btnExec_OnClick()
Dim GimpFilePath
Dim SrcFolderPath
Dim PosX, PosY, SelWidth, SelHeight
Dim iptGimpFile
Dim iptSrcFolder
Dim iptPosX, iptPosY, iptSelWidth, iptSelHeight
Dim Com
Dim f
Const FncName = "gaussian-blur-batch" 'GIMP関数名
'入力値取得
Set iptGimpFile = document.getElementById("iptGimpFile")
Set iptSrcFolder = document.getElementById("iptSrcFolder")
Set iptPosX = document.getElementById("iptPosX")
Set iptPosY = document.getElementById("iptPosY")
Set iptSelWidth = document.getElementById("iptSelWidth")
Set iptSelHeight = document.getElementById("iptSelHeight")
GimpFilePath= iptGimpFile.Value
SrcFolderPath = iptSrcFolder.Value
PosX= iptPosX.Value
PosY= iptPosY.Value
SelWidth= iptSelWidth.Value
SelHeight= iptSelHeight.Value
With CreateObject("Scripting.FileSystemObject")
'----- 値チェックここから -----
If (Len(Trim(GimpFilePath))) < 1 Then
MsgBox "GIMPの実行ファイルを指定してください。", vbCritical + vbSystemModal
iptGimpFile.Focus
Exit Sub
End If
If .FileExists(GimpFilePath) = False Then
MsgBox "[" & GimpFilePath & "]ファイルが見つかりません。" & vbNewLine & _
"処理を中止します。", vbCritical + vbSystemModal
iptGimpFile.Focus
Exit Sub
End If
If (Len(Trim(SrcFolderPath))) < 1 Then
MsgBox "対象フォルダを指定してください。", vbCritical + vbSystemModal
iptSrcFolder.Focus
Exit Sub
End If
If .FolderExists(SrcFolderPath) = False Then
MsgBox "[" & SrcFolderPath & "]フォルダが見つかりません。" & vbNewLine & _
"処理を中止します。", vbCritical + vbSystemModal
iptSrcFolder.Focus
Exit Sub
End If
If (Len(Trim(PosX))) < 1 Then
MsgBox "横位置(X)を指定してください。", vbCritical + vbSystemModal
iptPosX.Focus
Exit Sub
End If
If IsNumeric(PosX) = False Then
MsgBox "数値を入力してください。", vbCritical + vbSystemModal
iptPosX.Focus
Exit Sub
End If
If (Len(Trim(PosY))) < 1 Then
MsgBox "縦位置(Y)を指定してください。", vbCritical + vbSystemModal
iptPosY.Focus
Exit Sub
End If
If IsNumeric(PosY) = False Then
MsgBox "数値を入力してください。", vbCritical + vbSystemModal
iptPosY.Focus
Exit Sub
End If
If (Len(Trim(SelWidth))) < 1 Then
MsgBox "選択範囲幅(Width)を指定してください。", vbCritical + vbSystemModal
iptSelWidth.Focus
Exit Sub
End If
If IsNumeric(SelWidth) = False Then
MsgBox "数値を入力してください。", vbCritical + vbSystemModal
iptSelWidth.Focus
Exit Sub
End If
If (Len(Trim(SelHeight))) < 1 Then
MsgBox "選択範囲高さ(Height)を指定してください。", vbCritical + vbSystemModal
iptSelHeight.Focus
Exit Sub
End If
If IsNumeric(SelHeight) = False Then
MsgBox "数値を入力してください。", vbCritical + vbSystemModal
iptSelHeight.Focus
Exit Sub
End If
'----- 値チェックここまで -----
'コマンド文字列作成
Com = """" & GimpFilePath & """ -i "
For Each f In .GetFolder(SrcFolderPath).Files
Com = Com & "-b ""(" & FncName & " \""" & Replace(f.Path, ChrW(92), ChrW(92) & ChrW(92)) & "\"" " & PosX & " " & PosY & " " & SelWidth & " " & SelHeight & ")"" "
Next
Com = Com & "-b ""(gimp-quit 0)"""
'MsgBox Com '確認用
End With
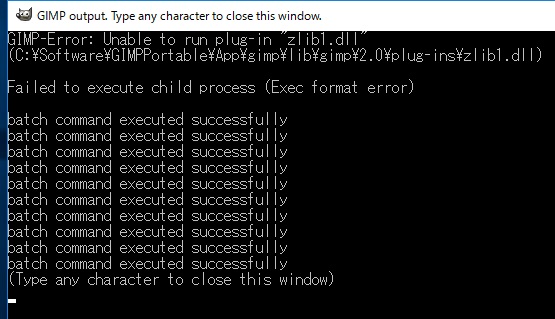
'バッチ処理実行
CreateObject("WScript.Shell").Run Com, 1, True
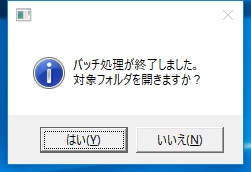
If MsgBox("バッチ処理が終了しました。" & vbNewLine & _
"対象フォルダを開きますか?", vbInformation + vbYesNo + vbSystemModal) = vbYes Then
CreateObject("Shell.Application").Open SrcFolderPath
End If
End Sub
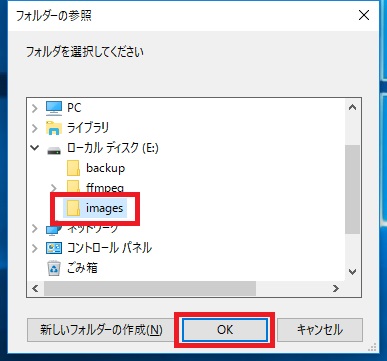
Private Sub btnSelectFolder_OnClick()
Dim f
With CreateObject("Shell.Application")
Set f = .BrowseForFolder(0, "フォルダを選択してください", 0, 0)
If Not f Is Nothing Then
On Error Resume Next
document.getElementById("iptSrcFolder").Value = f.Items.Item.Path
On Error GoTo 0
End If
End With
End Sub
</script>
</head>
<body>
<table>
<tr>
<td>GIMP:</td>
<td colspan="2"><input id="iptGimpFile" type="file" accept=".exe" size="40" title="GIMPの実行ファイルを選択します。"></td>
</tr>
<tr>
<td>対象フォルダ:</td>
<td><input id="iptSrcFolder" type="text" size="40"></td>
<td><input id="btnSelectFolder" type="button" value="選択" title="処理対象となるフォルダを指定します。"></td>
</tr>
<tr>
<td colspan="3">
<table>
<tr>
<td>X:</td>
<td><input id="iptPosX" type="text" size="4" title="横位置(X)を指定します。"></td>
<td>Y:</td>
<td><input id="iptPosY" type="text" size="4" title="縦位置(Y)を指定します。"></td>
<td>Width:</td>
<td><input id="iptSelWidth" type="text" size="4" title="選択範囲幅(Width)を指定します。"></td>
<td>Height:</td>
<td><input id="iptSelHeight" type="text" size="4" title="選択範囲高さ(Height)を指定します。"></td>
</tr>
</table>
</td>
</tr>
<tr>
<td colspan="3">
<input type="radio" id="rdo1" name="q" onclick="rdoSetValue_OnClick()"><label for="rdo1"> 初期値1</label>
<input type="radio" id="rdo2" name="q" onclick="rdoSetValue_OnClick()"><label for="rdo2"> 初期値2</label>
<input type="radio" id="rdo3" name="q" onclick="rdoSetValue_OnClick()"><label for="rdo3"> 初期値3</label>
</td>
</tr>
<tr>
<td colspan="3"><input id="btnExec" type="button" value="処理実行" title="バッチ処理を実行します。"></td>
</tr>
</table>
</body>
</html>
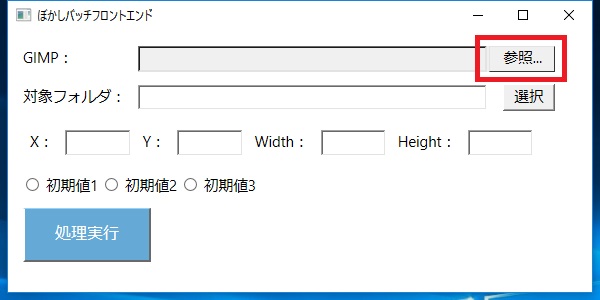
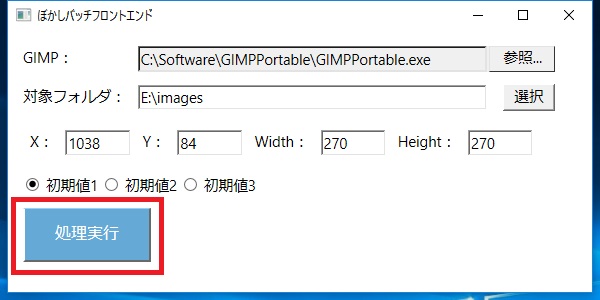
バッチ処理の実行
- 上記手順で作成したHTAファイルを実行します。
- 「GIMP」横にある「参照」ボタンをクリックして、事前に準備しておいたGIMPの実行ファイルを選択します。
- 「対象フォルダ」横にある「選択」ボタンをクリックして、処理対象のファイルが保存されているフォルダを選択します。
- ぼかしを入れる位置(X, Y, Width, Height)を指定します。「初期値」ボタンを選択することで、あらかじめ設定しておいた値を自動入力することができます。
- 「処理実行」ボタンをクリックするとバッチ処理が行われ、指定したフォルダ内の画像にぼかしが入ります。

これでようやく手作業でのぼかし処理から解放されました。
今回はじめてGIMPでバッチ処理を行ってみましたが、これはかなり強力な機能だと思います。
リサイズに色調補正、形式変換やシャープ処理など、大量の画像に対して一括処理する需要は多いはずなので、そんなときGIMPが役立つことを実感しました。
参考Webページ
- 3. Script-Fu 作成演習
- https://docs.gimp.org/ja/gimp-using-script-fu-tutorial.html
- GIMP2.6での画像バッチ処理について
- http://q.hatena.ne.jp/1331394065
- [GIMP][Lisp]GIMPを使ってコマンドラインから画像を変換する。
- http://d.hatena.ne.jp/natsutan/20110611/1307766376
- GIMPでバッチ処理をさせる
- http://kymemo.geo.jp/13.html
- GIMPバッチ処理について1
- http://www.fj-mapping.com/12_gimp-batch.html


この記事へのコメントはありません。