Power Automate for desktop(PAD)で使用できる独自のアクション、「カスタム アクション」を開発するためのSDKが公開されました。
今回はLearnの資料に沿って、カスタム アクションを作成・追加・実行する方法を紹介します。
※ 2023年5月時点ではまだプレビュー版の情報を元にしています。今後仕様等変更される可能性がある点にはご注意ください。
※ カスタム アクションはプレミアム機能であり、利用するには有償のライセンスが必要となります。
- 要件
- 自己署名証明書の作成とインポート
- Visual Studio用テンプレートのインストール
- Visual Studioによるカスタム アクションの作成
- dllファイルへの署名
- cabファイルへのパッケージ化
- cabファイルへの署名
- カスタム アクションのアップロード
- カスタム アクションの使用方法
- 参考資料
要件
- .NET Framework 4.7.2 SDK 以降
- Visual Studio 2022などの統合開発環境
- Power Automate for desktop バージョン 2.32 以降
- Microsoft.PowerPlatform.PowerAutomate.Desktop.Actions.SDK
自己署名証明書の作成とインポート
カスタム アクションを記述するdllファイルや必要なファイルをパッケージ化したcabファイル(後述)は、組織が信頼するデジタル証明書で適切に署名されている必要があります。また、カスタム アクションを含むフローを実行するマシンにもインストールする必要があるため、まずは自己署名証明書の作成とインポートを行います。
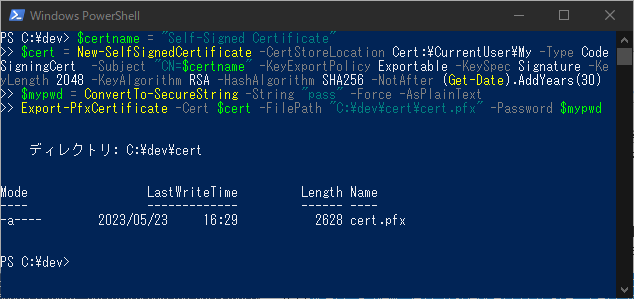
- Windows PowerShellを開きます。
- 下記コードをコピー&ペーストして実行します。 ※パスワード(下記では「pass」)やエクスポート先(下記では「C:\dev\cert\cert.pfx」)は適宜変更しておきます。
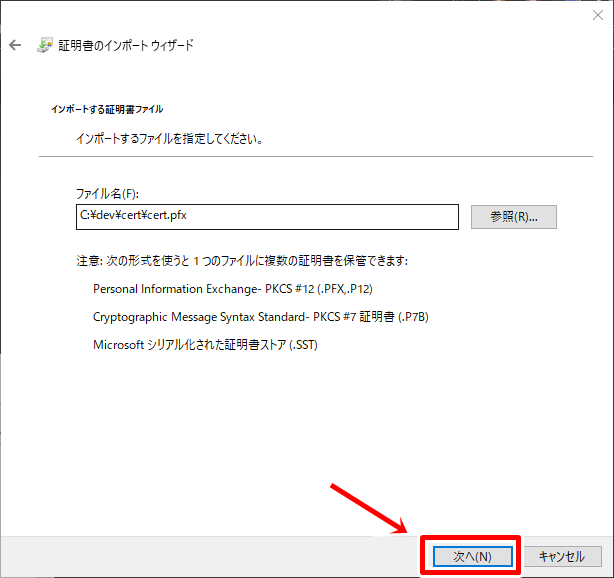
- エクスポートとした証明書をダブルクリックして証明書のインポート ウィザードを開きます。
- 保存場所として「現在のユーザー」を選択し、「次へ」ボタンをクリックします。
- インポートする証明書のファイル名が正しいことを確認し、「次へ」ボタンをクリックします。
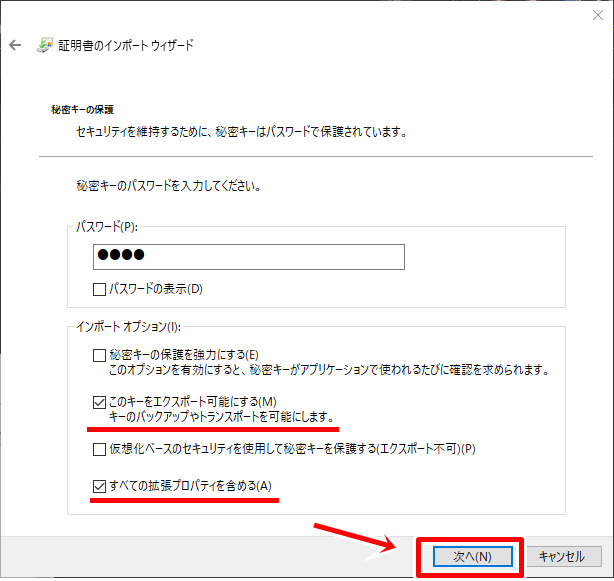
- 証明書を作成したときに指定したパスワードを入力し、「このキーをエクスポート可能にする」と「すべての拡張プロパティを含める」にチェックを入れ、「次へ」ボタンをクリックします。
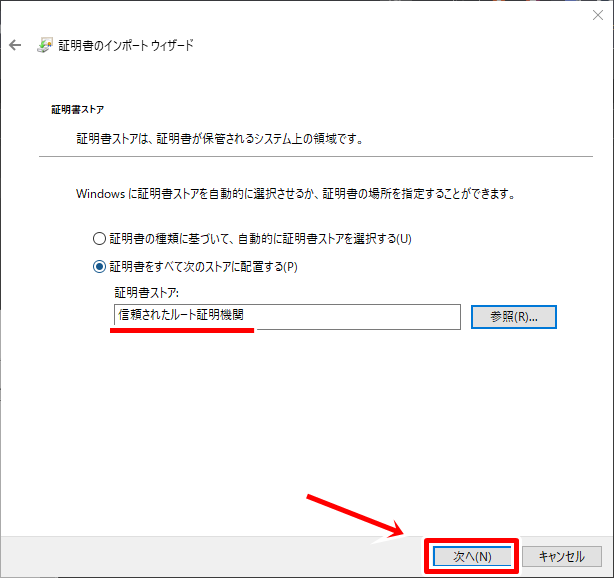
- 「参照」ボタンから使用する証明書ストアとして「信頼されたルート証明機関」を選択し、「次へ」ボタンをクリックします。
- 「完了」ボタンをクリックします。
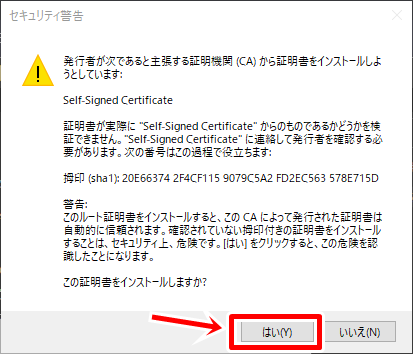
- “発行者が次であると主張する証明機関 (CA) から証明書をインストールしようとしています”警告が表示された場合は「はい」ボタンをクリックします。
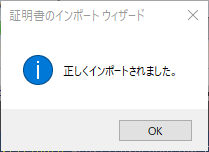
- 「正しくインポートされました。」メッセージが表示されたら証明書のインポートは完了です。
$certname = "Self-Signed Certificate"
$cert = New-SelfSignedCertificate -CertStoreLocation Cert:\CurrentUser\My -Type CodeSigningCert  -Subject "CN=$certname" -KeyExportPolicy Exportable -KeySpec Signature -KeyLength 2048 -KeyAlgorithm RSA -HashAlgorithm SHA256 -NotAfter (Get-Date).AddYears(30)
$mypwd = ConvertTo-SecureString -String "pass" -Force -AsPlainText
Export-PfxCertificate -Cert $cert -FilePath "C:\dev\cert\cert.pfx" -Password $mypwd


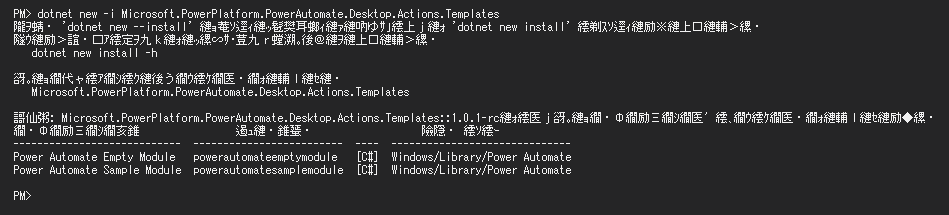
Visual Studio用テンプレートのインストール
Visual Studioのパッケージ マネージャーで下記コマンドを実行してテンプレートをインストールします。
dotnet new -i Microsoft.PowerPlatform.PowerAutomate.Desktop.Actions.Templates
Visual Studioによるカスタム アクションの作成
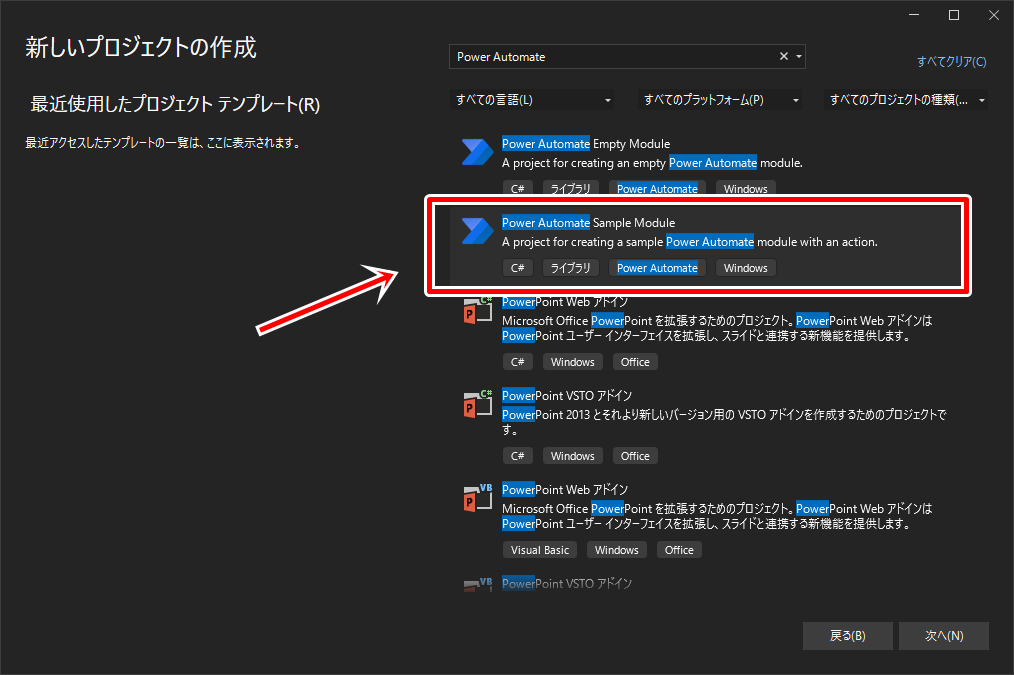
- テンプレートインストール後、「Power Automate Sample Module」テンプレートから新規プロジェクトを作成します。
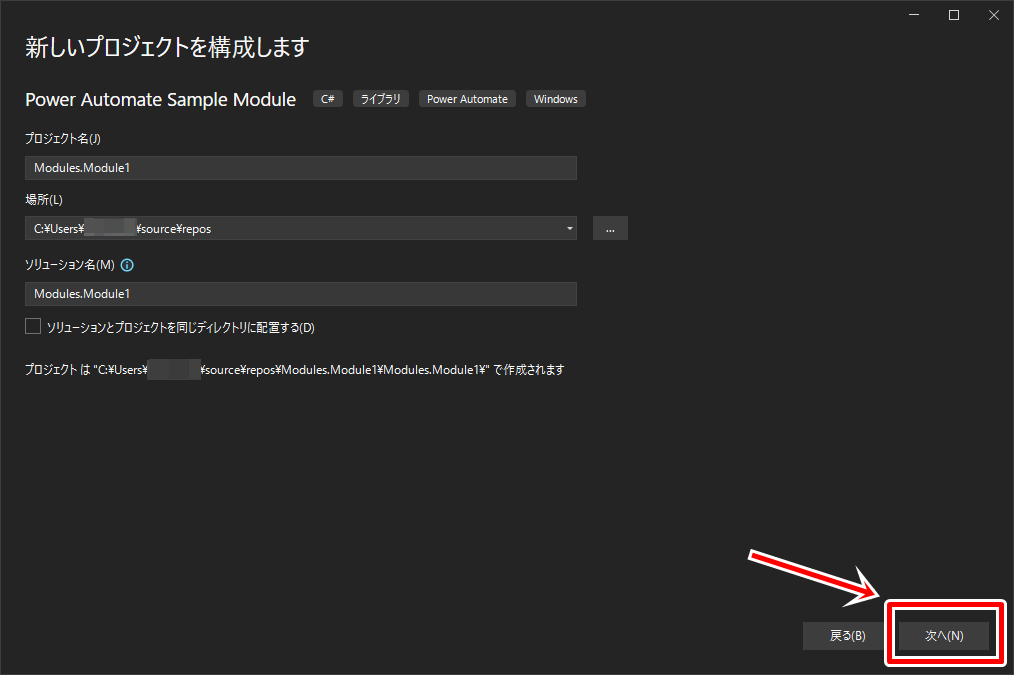
- プロジェクト名、場所、ソリューション名を入力して「次へ」ボタンをクリックします。
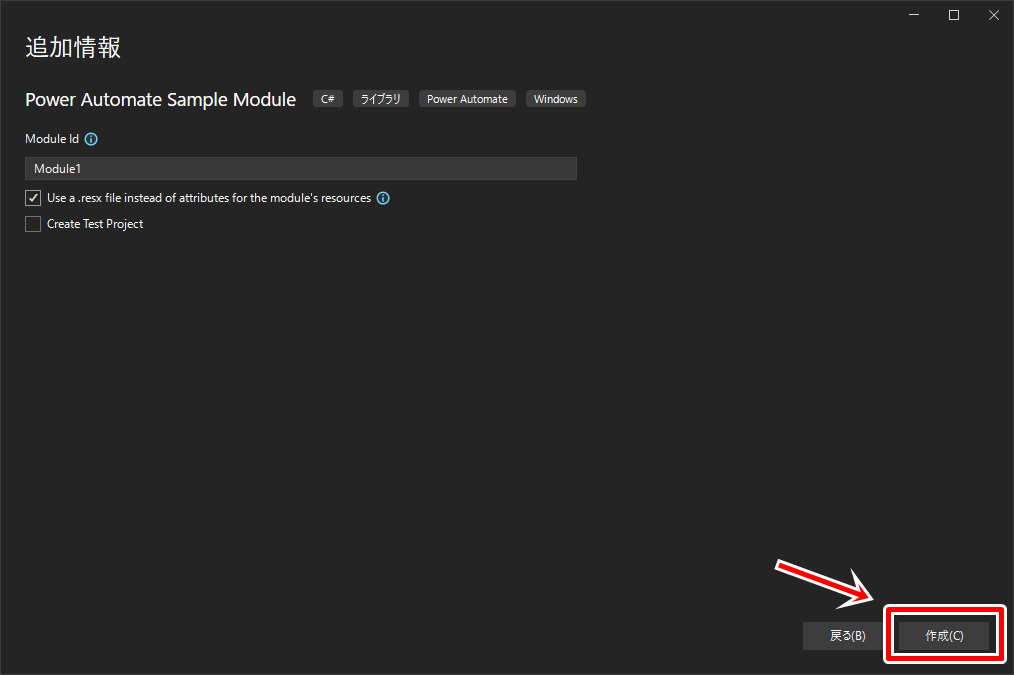
- 「Use a .resx file instead of attributes for the module’s resources」にチェックを入れ、「Create Test Project」のチェックを外し、「作成」ボタンをクリックします。
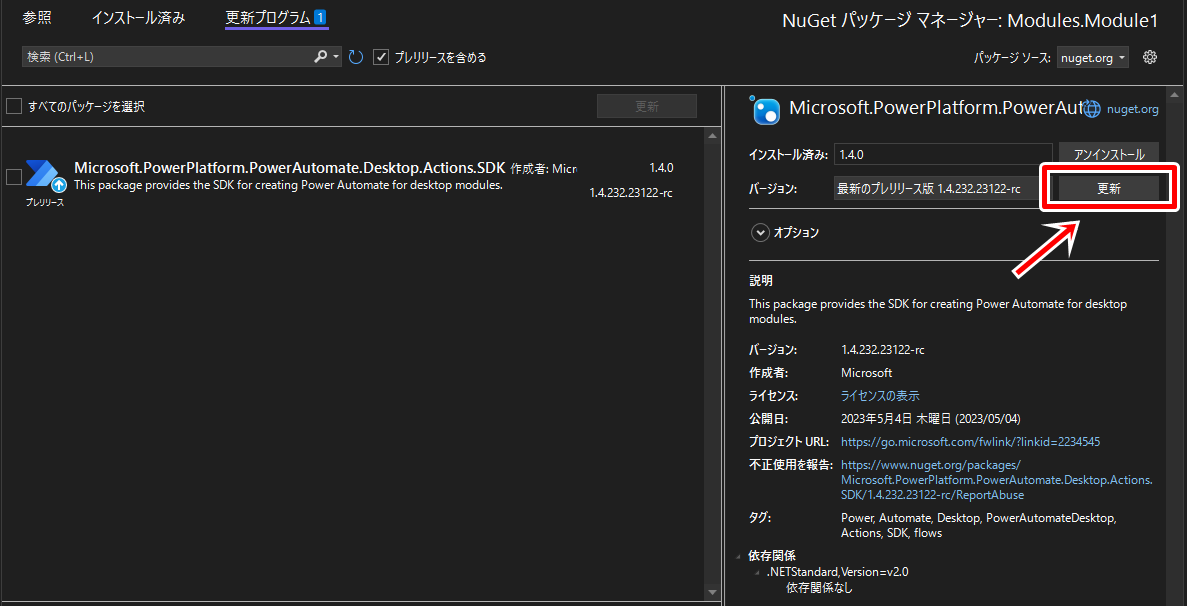
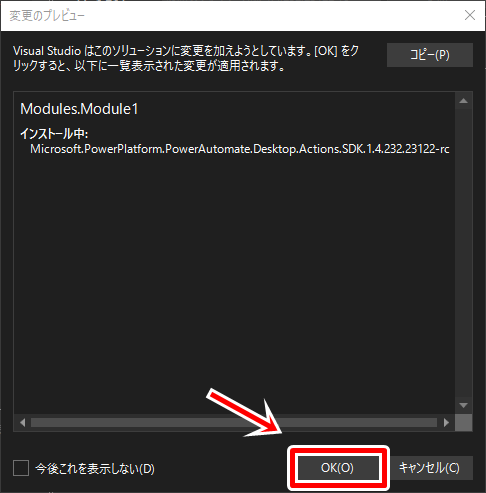
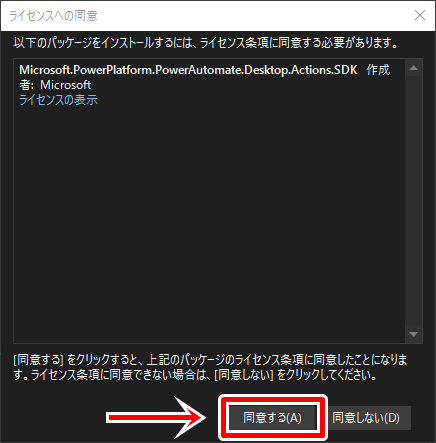
- プロジェクトが作成されたらNuGet パッケージ マネージャーから「Microsoft.PowerPlatform.PowerAutomate.Desktop.Actions.SDK」パッケージを最新版に更新します(2023年5月23日時点では「最新のプレリリース版 1.4.232.23122-rc」。
- 重複するPackageReference項目が見つかるので *.csproj ファイルをエディターで編集して Microsoft.PowerPlatform.PowerAutomate.Desktop.Actions.SDK のバージョンを変更します。
- Action1.cs を下記のように編集し、ソリューションをビルドします。
- 問題なくdllが出力されればカスタム アクションの作成作業は完了です。
    <ItemGroup>
		<PackageReference Include="Microsoft.PowerPlatform.PowerAutomate.Desktop.Actions.SDK" Version="1.4.232.23122-rc" />
    </ItemGroup>

using System;
using System.ComponentModel;
using Microsoft.PowerPlatform.PowerAutomate.Desktop.Actions.SDK;
using Microsoft.PowerPlatform.PowerAutomate.Desktop.Actions.SDK.Attributes;
namespace Modules.Module1
{
[Action(Id = "Action1", Order = 1)]
[Throws("ActionError")] // TODO: change error name (or delete if not needed)
public class Action1 : ActionBase
{
#region Properties
// NOTE: You can find sample description and friendly name entries in Resources
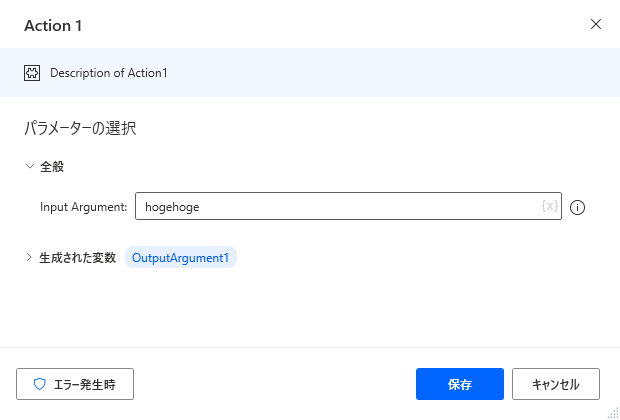
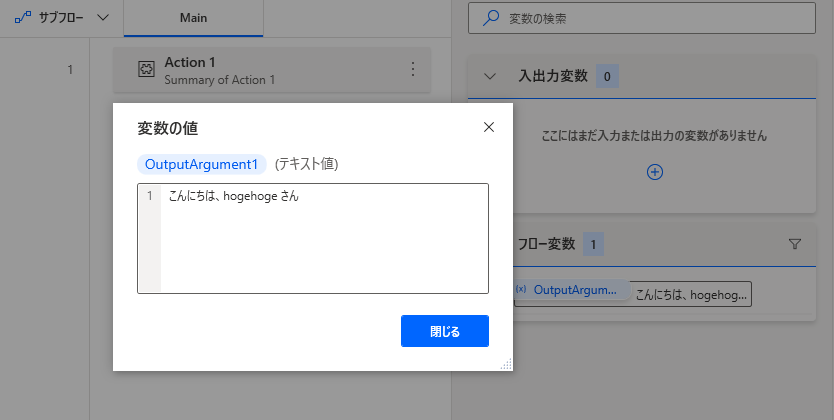
[InputArgument, DefaultValue("hogehoge")]
public string InputArgument1 { get; set; }
[OutputArgument]
public string OutputArgument1 { get; set; }
#endregion
#region Methods Overrides
public override void Execute(ActionContext context)
{
try
{
OutputArgument1 = $"こんにちは、{InputArgument1} さん";
}
catch (Exception e)
{
if (e is ActionException) throw;
throw new ActionException("ActionError", e.Message, e.InnerException);
}
// TODO: set values to Output Arguments here
}
#endregion
}
}
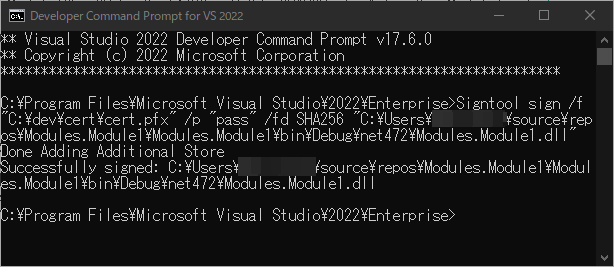
dllファイルへの署名
Visual Studioの開発者コマンド プロンプトから下記コマンドを実行して作成したdllに署名します。 ※dllファイルのパスは適宜変更しておきます。
Signtool sign /f "C:\dev\cert\cert.pfx" /p "pass" /fd SHA256 "C:\Users\(ユーザー名)\source\repos\Modules.Module1\Modules.Module1\bin\Debug\net472\Modules.Module1.dll"
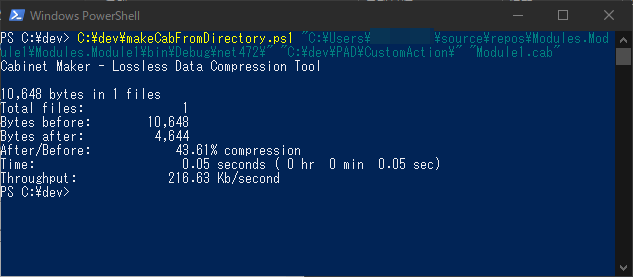
cabファイルへのパッケージ化
作成したdllファイルは依存するファイルと共にcabファイルとしてパッケージ化する必要があります。
下記PowerShellスクリプト(makeCabFromDirectory.ps1)に圧縮するdllファイルのフォルダーパス、cabファイルの保存先フォルダーパスとファイル名を引数として渡して実行することでcabファイルを作成できます。
param(

    [ValidateScript({Test-Path $_ -PathType Container})]
	[string]
	$sourceDir,

	[ValidateScript({Test-Path $_ -PathType Container})]
    [string]
    $cabOutputDir,

    [string]
    $cabFilename
)

$ddf = ".OPTION EXPLICIT
.Set CabinetName1=$cabFilename
.Set DiskDirectory1=$cabOutputDir
.Set CompressionType=LZX
.Set Cabinet=on
.Set Compress=on
.Set CabinetFileCountThreshold=0
.Set FolderFileCountThreshold=0
.Set FolderSizeThreshold=0
.Set MaxCabinetSize=0
.Set MaxDiskFileCount=0
.Set MaxDiskSize=0
"
$ddfpath = ($env:TEMP + "\customModule.ddf")
$sourceDirLength = $sourceDir.Length;
$ddf += (Get-ChildItem $sourceDir -Filter "*.dll" | Where-Object { (!$_.PSIsContainer) -and ($_.Name -ne "Microsoft.PowerPlatform.PowerAutomate.Desktop.Actions.SDK.dll") } | Select-Object -ExpandProperty FullName | ForEach-Object { '"' + $_ + '" "' + ($_.Substring($sourceDirLength)) + '"' }) -join "`r`n"
$ddf | Out-File -Encoding UTF8 $ddfpath
makecab.exe /F $ddfpath
Remove-Item $ddfpath
ps1ファイルを実行できない場合は下記サイトを参考にポリシーをご確認ください。

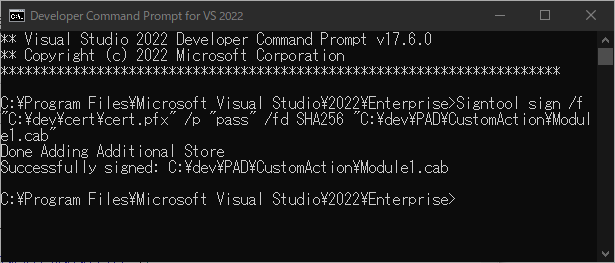
cabファイルへの署名
dllファイルと同様にパッケージ化したcabファイルも署名する必要があります。 ※cabファイルのパスは適宜変更しておきます。
Signtool sign /f "C:\dev\cert\cert.pfx" /p "pass" /fd SHA256 "C:\dev\PAD\CustomAction\Module1.cab"
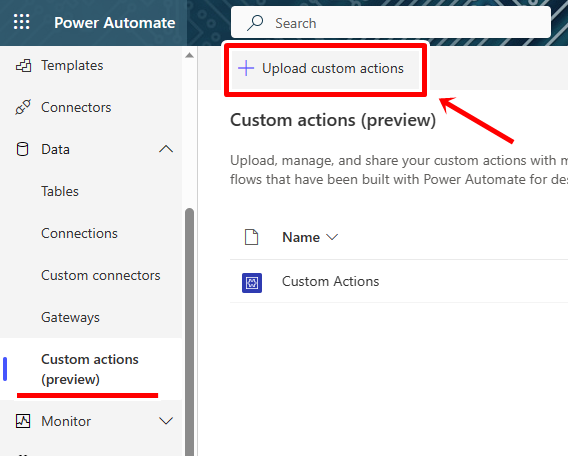
カスタム アクションのアップロード
cabファイルの署名まで終わったら、作成したカスタム アクションのアップロードを行います。
- https://make.powerautomate.com/ にアクセスしてサインインします。
- 「Data」の下にある「Custom actions」を開き、「Upload custom actions」をクリックします。
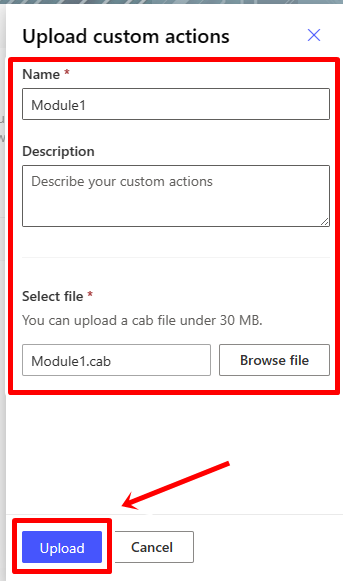
- 「Name」、必要に応じて「Description」を入力し、「Select file」から作成したcabファイルを選択後「Upload」ボタンをクリックします。
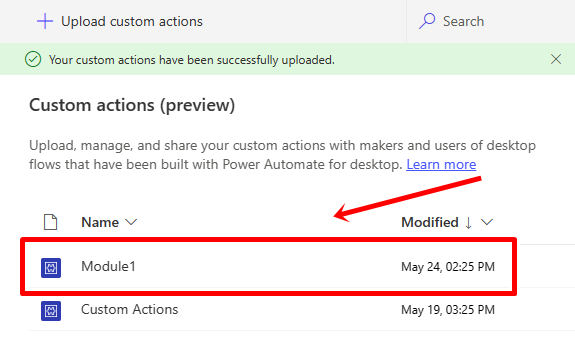
- アップロードしたアクションがリストに追加されれば作業完了です。
カスタム アクションの使用方法
カスタム アクションのアップロードが終わったら、作成したアクションをフローに組み込むことができます。
- Power Automate for desktopのデザイナーを開きます。
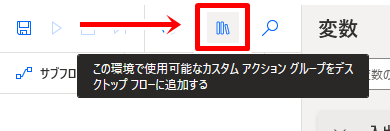
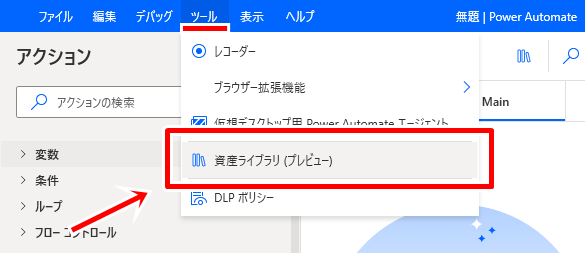
- 画面上部にある「資産ライブラリ」アイコン、もしくはツールメニューにある「資産ライブラリ」から資産ライブラリを開きます。
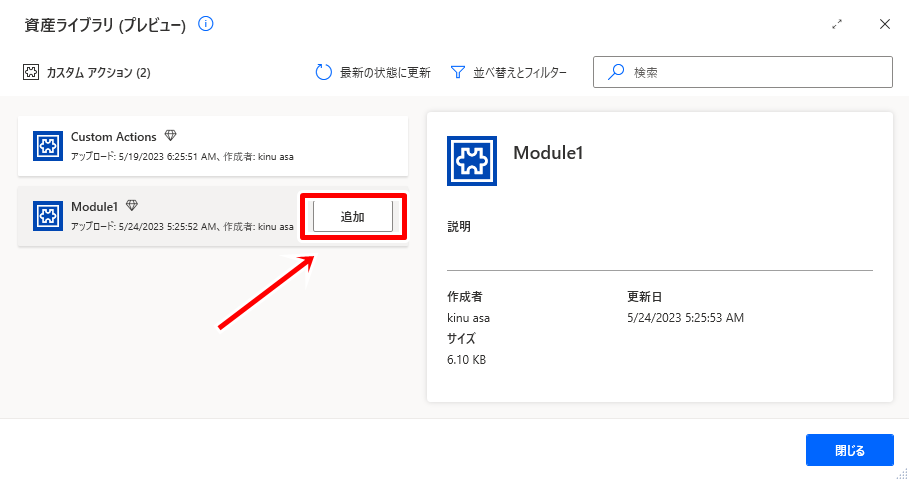
- アップロードしたカスタム アクションを選択し、「追加」ボタンをクリックします。
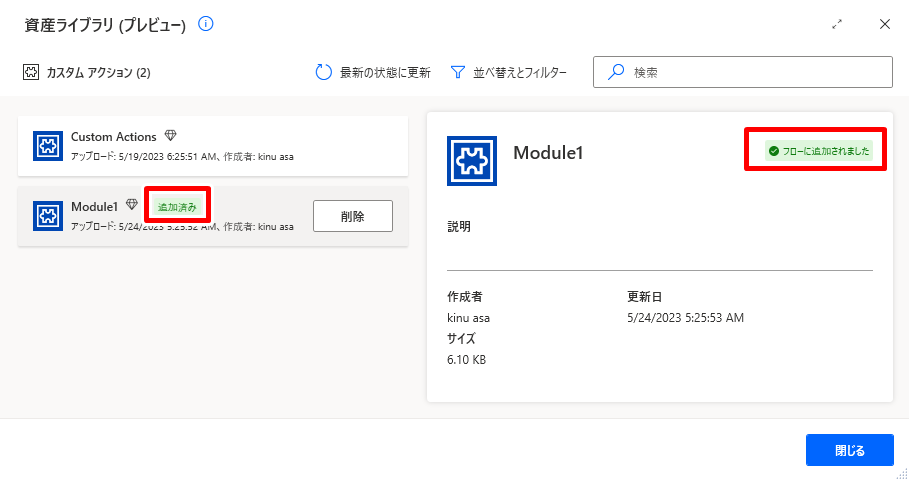
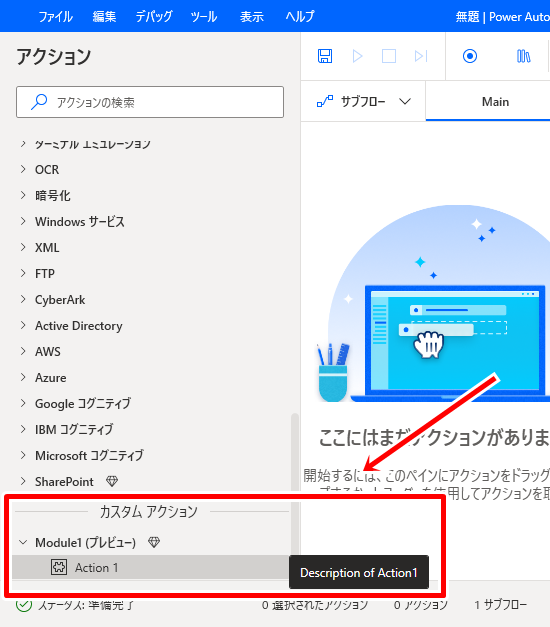
- 資産ライブラリ画面を閉じると、「カスタム アクション」セクションにアクションが追加されていることが確認できます。
- 問題なくカスタム アクションを追加できると、後は通常のアクションと同様にフローに組み込むことができます。
カスタム アクションを作成、追加、実行する方法の紹介は以上です。
詳細は下記の参考資料をご参照ください。

![[Power Automate for desktop]電卓を操作するカスタム アクション](https://www.ka-net.org/blog/wp-content/uploads/eyecatch-PowerAutomateDesktop-120x120.jpg)


この記事へのコメントはありません。