
先日書いた記事に続いて、Google Apps ScriptでGoogle スライドを操作してみます。
今回は、スライド上にテキストボックスを追加&追加したテキストの文字装飾を行うコードです。Google スライドでスクリプトを実行する方法については下記記事をご参照ください。
![[Google Apps Script]Google スライドでスクリプトを実行する](https://www.ka-net.org/blog/wp-content/uploads/eyecatch-Google-120x120.png)
function myFunction() {
  var slide = SlidesApp.getActivePresentation().getSlides()[0]; //スライド1枚目
  //テキストボックス追加(insertShape(shapeType, left, top, width, height))
  var shape = slide.insertShape(SlidesApp.ShapeType.TEXT_BOX, 50, 100, 200, 60);
  var txtRng = shape.getText();
  txtRng.setText("Hello, World!"); //テキストボックスの文字設定
  //文字装飾:
  //太字+背景色(青)+文字色(白)+フォント(Indie Flower)+文字サイズ(32)
  txtRng.getTextStyle().setBold(true)
                       .setBackgroundColor('#0000ff')
                       .setForegroundColor("#ffffff")
                       .setFontFamily("Indie Flower")
                       .setFontSize(32);
  //中央揃え
  txtRng.getParagraphStyle().setParagraphAlignment(SlidesApp.ParagraphAlignment.CENTER);
}
上記コードを実行すると、スライドの1枚目にテキストボックスを追加し、文字列「Hello, World!」を設定します。
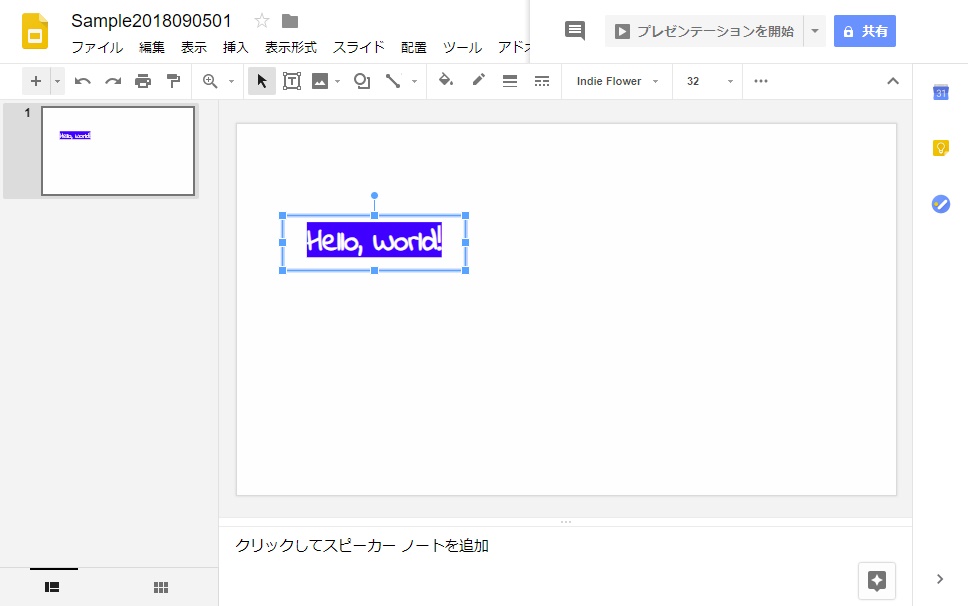
各処理で使用しているメソッドは下記の通りで、文字の装飾は主にTextStyleクラスのメソッドで行います。
- スライドの取得:Presentation.getSlidesメソッド
- テキストボックスの追加:Slide.insertShapeメソッド
- TextRangeの取得:Shape.getTextメソッド
- 文字設定:TextRange.setTextメソッド
- TextStyleの取得:TextRange.getTextStyleメソッド
- 太字設定:TextStyle.setBoldメソッド
- 背景色設定:TextStyle.setBackgroundColorメソッド
- 前景色設定:TextStyle.setForegroundColorメソッド
- フォント設定:TextStyle.setFontFamilyメソッド
- フォントサイズ設定:TextStyle.setFontSizeメソッド
- ParagraphStyleの取得:TextRange.getParagraphStyleメソッド
- 段落の整列設定(中央揃え):ParagraphStyle.setParagraphAlignmentメソッド


この記事へのコメントはありません。